

Monday, December 24, 2012
MERRY CHRISTMAS!!
Blog posts will resume on 12/27, enjoy the holidays with your friends and families! Merry Christmas everybody!!


Sunday, December 23, 2012
Speedster Sunday: Reviews of DCUC Wave 20 Reverse Flash &All Stars TRU Exclusive Flash!
Today marks the 1 year anniversary of this ol' blog on the Internet, and I have to tell you it doesn't even feel like it's been a year. It's as though the time just went by in a flash! So in honor of that, for the anniversary post I bring you two of my all time favorite DCUC's for Speedster Sunday!

Character Bios:
The Flash:
 As Barry Allen went about his business in the police crime
lab, and electrical storm broke over Central City. Soon the lab exploded with a
blinding bolt of lightning, bathing Barry in the supercharged fluids. This
random combination of chemicals turned Barry into the fastest man alive! As The
Flash, Allen vowed to use these powers to help humanity and guard Central City
with high-velocity vigilance!
 Born in the 25th century, Eobard Thawne was a fan of the
Flash and wanted more than anything to be like the object of his obsession. He
went so far as to transform his own face into Barry Allen's likeness and
recreated the bath of supercharged fluids, giving Thawne the same powers.
Thawne traveled back in time to meet Barry, but the travel made him mentally
unstable and he became a supervillain bent on the destruction of his former
idol.


The Flash: 10 OUT OF 10!!!
Professor Zoom: 10 OUT OF 10!!!


The Basics:
Price Range: $15.99 - $65.99
Price Range: $15.99 - $65.99
Scale: 6"
Character Bios:
The Flash:
 As Barry Allen went about his business in the police crime
lab, and electrical storm broke over Central City. Soon the lab exploded with a
blinding bolt of lightning, bathing Barry in the supercharged fluids. This
random combination of chemicals turned Barry into the fastest man alive! As The
Flash, Allen vowed to use these powers to help humanity and guard Central City
with high-velocity vigilance!
For more check out: http://dc.wikia.com/wiki/Flash
Professor Zoom - The Reverse Flash:
 Born in the 25th century, Eobard Thawne was a fan of the
Flash and wanted more than anything to be like the object of his obsession. He
went so far as to transform his own face into Barry Allen's likeness and
recreated the bath of supercharged fluids, giving Thawne the same powers.
Thawne traveled back in time to meet Barry, but the travel made him mentally
unstable and he became a supervillain bent on the destruction of his former
idol.
For more check out: http://dc.wikia.com/wiki/Professor_Zoom
Now, onto the Review!
Sculpt and Paint:
The sculpt of the two figures are the same as the sculpt of the original DCUC Flash from Wave 7, the only difference being the head sculpt of Professor Zoom, and Professor Zoom having an open left hand to hold his accessory. Other than that nothing was changed. The Flash still looks just as good as he originally did, and I think this paint job does the figure much more justice then the paint job on the original figure did, the original being the bright red of Zoom's ear pieces and a slightly darker yellow than Zoom's. Zoom's head sculpt looks fantastic, and overall these two figures just compliment each other so well. To me, even though they share the same body mold, these figures are two real gems to come out of the DCUC line. My only nitpick is that It would be great to have The Flash and Zoom each come with interchangeable hands, two fists, and two that have the "flat open palm" look that the Flash or Tom Cruise has, when they run.
Articulation and Accessories:
The Flash comes with a standard DCUC display base which I cannot for the life of me find in time for the review. Professor Zoom comes with his lighting rod baton, which I can't really get into without giving massive spoilers, but I will say it is essential that he came with it. For articulation, since they are the same body, you guessed it, same articulation! It's your standard DCUC articulation. Ball jointed head, Swivel-hinge shoulders,
swivel bicep, hinge elbow, swivel wrist, ab-crunch, swivel waist, T-joint hips,
swivel thigh, hinge knee, and hinge ankle!
Overall:
I know I've already said it but these are two DCUC figures that are gems. They are a shining example of how the DCUC line can take two characters, simple in sculpt and accessories, and make them the most memorable of the line. The trick though is finding The Flash, Professor Zoom is a bit easier to find. Flash can run you as much as $100 on the secondhand market which is the only way to get him now, Zoom is still up there but not by much, I was able to find him for $15 on amazon. That said, happy hunting, because these guys are definitely worth the hunt!
The Flash: 10 OUT OF 10!!!
Professor Zoom: 10 OUT OF 10!!!
Now that the review is done, I'd like to just say that it's been a great first year for this blog, and I'd like to thank all of you that check this blog out and keep coming back for more. Thank you guys, and have a great Christmas!
Saturday, December 22, 2012
Back in a Flash!
OK!!! So I've finally finished my first semester of college which means all of my papers and finals have been completed which means MORE POSTS!!! Due to preperation for the holiday season, new posts will start up on December 27th. On the 27th I will have apost just for the release of Spider-man #700. After that expect posts for a Christmas haul, more figure reviews, customs, and the annual "Best of". Tommorrow, December 23rd also marks one full year of the blog being up, and I have a special review planned for that! That's it for now, see you guys tomorrow!!

Tuesday, December 11, 2012
Man of Steel trailer #2!!!!
HERE IT IS!!!!!!!!!!!!!! I have been waiting for ever and this is just incredible!Hit 1080p for best quality and check out the Man of Steel in theaters this June!
Saturday, November 24, 2012
Go-Figure Post #2!
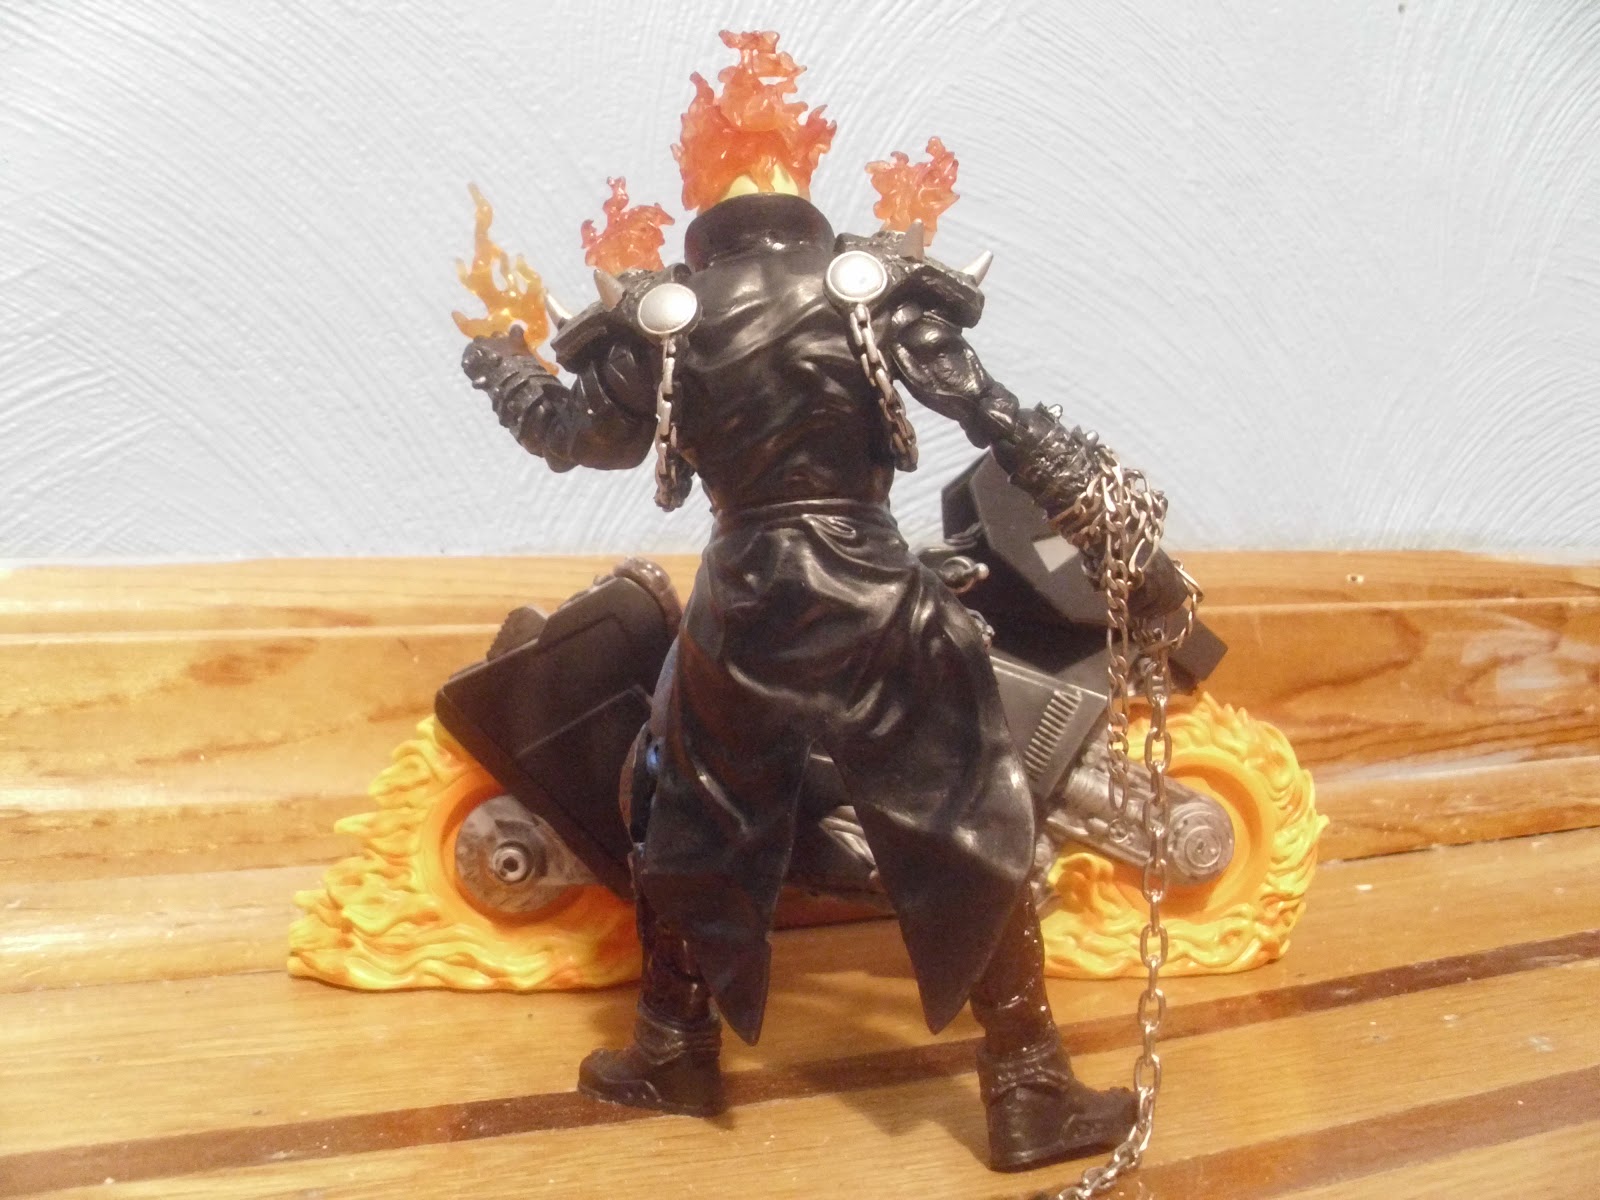
Hey guys, so originally these were going to be divided into several different posts but I decided to string'em together in one post. Today we'll be looking at some quick mods and customizations. The first one is probably the most complex, Marvel Legends Ghost Rider! Now I had modded this guy in the past but I was never fully satisfied with him but now, I think we have a winner!

Supplies Needed:
Needle-Nose pliers
Needle-Nose pliers
neck chain
Blue Sharpie Paint Marker
Paper Towels
crazy glue

First remove all additional pieces, his jacket, belt, and head. Take the paint marker and go over the pants a bit at a time. after leaving the paint on for 5 seconds take a paper towel and smudge it around to create the denim-esque look. Next for the jacket, my initial problem was that it was too clunky. Therefore I cut off the pegs and peghole pieces of the jacket. Trimmed down the underarm area so his arms can go down to his side, and glued it down to his torso so it stays in place and looks more form fitting. The shoulder pads, I trimmed the outer edges so the arms have more clearance to move forward and back as well as out to the side. On the belt I removed most of the chains save for the top right chain. As for the fire accessory in his hand, its just a marvel universe iron fist accessory. The neck chain can be used however you like, I like wrapping it around his forearm and having it go all the way to the floor.

Next up is Marvel Legends Thor. This started out as a wave 1 Return of Marvel Legends Thor, but I wanted a Marvel Now! Avengers #1 Thor. I did take some liberties with the design though ( I dont like the black under the arms on the design).

Supplies Needed:
Needle Nose pliers
Red fabric
Scissors
black fabric
Black Sharpie Paint Marker
Rubber bands
Wal Mart Exclusive 6" Movie Thor
Crazy glue.
I started with the head. I cut the hair off from below the wings foward, took the wings from the wal mart thor off, flipped them upside down and glued them on to the underside of this Thor's wings to create the cheek guards, then took the hair I cut off and glued that onto the bottom of the flipped wings. and painted the whole helmet silver.

Now, I repainted his whole torso, boots, and sash...thingy with the black shrpie paint marker, give it a half hour to dry. I also painted on fingerless gloves to his hand. Also let dry for a half hour. While that drys, begin cutting the black fabric to glue onto the front of the sash (See first pic) and cut the cape. Cut off the original cape, take the fabric and line up the top so that the layers connected to the uru orbs are layered (see above) and glue down. wait 30 seconds, re apply glue, wait 30 seconds and apply a lien of glue where the cloth meets the orbs for extra security. Lastly, wrap the rubber bands around his calves and ankles. That's about it!
Next is The Avengers Mark VII Iron Man. This guy started out as the Mark IV but when I found out Hasbro wouldnt be making a 6" Mark VII I got to work. This is a straight up repaint.
Supplies Needed:
Sharpie silver paint marker
Sharpie gold marker
Sharpie ultra fine point black marker
This is the easiest one. Just print yourself out a pictue of the Mark VII and go to town. I oulined all the lines in the armor with the black sharpie. But here's the trick, the gold areas. Paint in silver first, then once it dries, go over it in gold regular sharpie marker to get the most accurate gold tone.


Now last but not least we have The Avengers Thor. I found out that yet again Hasbro would not be making an Avengers style Thor in 6" scale so I got to work.

Supplies Needed:
Marvel Select Thor
Red Sharpie paint marker
Blue Sharpie paint marker
Navy Blue Sharpie
Black Sharpie
lighting effects from any Star Wars 3 3/4" figure
crazy glue
scissors
red cloth
paper towels
In the torso, match your figure to the above image, and you'll notice some of the black area on the torso armor was silver, simpl go over it in black Sharpie and rub it in with a paper towel. Next wherever you see a red outline on the torso, that was done with the Red paint marker. As for the gauntlets the red around them is just red cloth that I cut and glued down. For Mjolnir, I just crazy glued lighting bits all over it. For the head, take the Marvel Select Thor head and take a scissor and scrape around the inside to create a hole that will fit snugly on the ball joint. Finally remove the cape that the figure comes with, and glue on the Marvel Select Thor cape.

Thats it for today, hope you guys enjoyed!
Deleting Posts.
Ok guys, so sadly I ran out of space for picture storing on the blog and I cannot get more unless I delete pictures from Picasa but that would delete them from the blog. That said, this blog will not die, but the older posts will have to be deleted as well as some newer posts. I'm sorry I have to do this, I wish I didnt have to, but this blog must live on.
Thursday, November 8, 2012
Hurricane, Lost Drafts, and New Figures
Ok, so as most of you probably know, New York was hit with a massive hurricane. I myself got lucky and only lost power, for about 4 days or so. When I finally got back online, my drafts were all gone. That said it will take some time to retype and reupload the photos I had. I had a bunch on here that way I could post them at a faster and more organized rate. I am currently in the process of redoing them and will hopefully have everything back by this weekend, and a new figure review by this weekend. Thanks for sticking with the blog guys!
Subscribe to:
Posts (Atom)